-
LINUX PROXY(프록시)서버 구현하는 방법System of Infra/Linux System 2022. 7. 11. 01:00728x90반응형

LINUX PROXY(프록시)서버 구현하는 방법
★프록시 설명
1. 프록시 서버는 클라이언트 가 자신을 통해서 다른 네트워크 서비스에 간접적으로 접속할 수 있게 해 주는 컴퓨터 시스템이나 응용 프로그램을 말함.
2. 서버와 클라이언트 사이에 중계기로써 대리로 통신을 수행하는 것을 가리켜 '프록시', 그 중계 기능을 하는 것을 프록시 서버라고 부름.
리눅스 서버#1(프록시서버) : 192.168.111.100
리눅스 서버#2 : 192.168.111.130
윈도우 서버#3 : 192.168.111.128[root@localhost /]# dnf -y install squid CentOS-8 - AppStream 2.4 kB/s | 4.3 kB 00:01 CentOS-8 - Base 2.1 kB/s | 3.9 kB 00:01 CentOS-8 - PowerTools 2.4 kB/s | 4.3 kB 00:01 CentOS-8 - Plus 1.7 kB/s | 3.0 kB 00:01 CentOS-8 - Extras 858 B/s | 1.5 kB 00:01 종속성이 해결되었습니다. ======================================================================================================== 꾸러미 아키텍처 버전 리포지토리 크기 ======================================================================================================== Installing: squid x86_64 7:4.4-5.module_el8.0.0+182+b6dc903f AppStream 3.6 M 종속성 설치: libecap x86_64 1.0.1-2.module_el8.0.0+182+b6dc903f AppStream 29 k perl-DBI x86_64 1.641-2.module_el8.0.0+66+fe1eca09 AppStream 740 k perl-Digest-SHA x86_64 1:6.02-1.el8 AppStream 66 k perl-Math-BigInt noarch 1:1.9998.11-5.el8 BaseOS 195 k perl-Math-Complex noarch 1.59-416.el8 BaseOS 108 k Enabling module streams: perl-DBI 1.641 squid 4 거래 요약 ======================================================================================================== 설치 6 꾸러미 총 다운로드 크기 : 4.7 M 설치 크기 : 16 M 패키지 다운로드중: (1/6): libecap-1.0.1-2.module_el8.0.0+182+b6dc903f.x86_64.rpm 14 kB/s | 29 kB 00:02 (2/6): perl-Digest-SHA-6.02-1.el8.x86_64.rpm 28 kB/s | 66 kB 00:02 (3/6): perl-Math-BigInt-1.9998.11-5.el8.noarch.rpm 232 kB/s | 195 kB 00:00 (4/6): perl-Math-Complex-1.59-416.el8.noarch.rpm 241 kB/s | 108 kB 00:00 (5/6): perl-DBI-1.641-2.module_el8.0.0+66+fe1eca09.x86_64.rpm 185 kB/s | 740 kB 00:04 (6/6): squid-4.4-5.module_el8.0.0+182+b6dc903f.x86_64.rpm 566 kB/s | 3.6 MB 00:06 -------------------------------------------------------------------------------------------------------- 합계 564 kB/s | 4.7 MB 00:08 트랜잭션 점검 실행 중 트랜잭션 검사가 성공했습니다. 트랜잭션 테스트 실행 중 트랜잭션 테스트가 완료되었습니다. 거래 실행 중 준비 중입니다 : 1/1 Installing : perl-Math-Complex-1.59-416.el8.noarch 1/6 Installing : perl-Math-BigInt-1:1.9998.11-5.el8.noarch 2/6 Installing : perl-DBI-1.641-2.module_el8.0.0+66+fe1eca09.x86_64 3/6 Installing : perl-Digest-SHA-1:6.02-1.el8.x86_64 4/6 Installing : libecap-1.0.1-2.module_el8.0.0+182+b6dc903f.x86_64 5/6 스크립틀릿 실행: libecap-1.0.1-2.module_el8.0.0+182+b6dc903f.x86_64 5/6 스크립틀릿 실행: squid-7:4.4-5.module_el8.0.0+182+b6dc903f.x86_64 6/6 Installing : squid-7:4.4-5.module_el8.0.0+182+b6dc903f.x86_64 6/6 스크립틀릿 실행: squid-7:4.4-5.module_el8.0.0+182+b6dc903f.x86_64 6/6 확인 중 : libecap-1.0.1-2.module_el8.0.0+182+b6dc903f.x86_64 1/6 확인 중 : perl-DBI-1.641-2.module_el8.0.0+66+fe1eca09.x86_64 2/6 확인 중 : perl-Digest-SHA-1:6.02-1.el8.x86_64 3/6 확인 중 : squid-7:4.4-5.module_el8.0.0+182+b6dc903f.x86_64 4/6 확인 중 : perl-Math-BigInt-1:1.9998.11-5.el8.noarch 5/6 확인 중 : perl-Math-Complex-1.59-416.el8.noarch 6/6 설치됨: squid-7:4.4-5.module_el8.0.0+182+b6dc903f.x86_64 libecap-1.0.1-2.module_el8.0.0+182+b6dc903f.x86_64 perl-DBI-1.641-2.module_el8.0.0+66+fe1eca09.x86_64 perl-Digest-SHA-1:6.02-1.el8.x86_64 perl-Math-BigInt-1:1.9998.11-5.el8.noarch perl-Math-Complex-1.59-416.el8.noarch 완료되었습니다!▶ 리눅스 서버#1(프록시 서버)에서 squid 서비스 패키지를 설치합니다.
★스퀴드(squid) 설명
1. 스퀴드(squid)는 대중적인 오픈 소스(GPL) 소프트웨어 프록시 서버이자 웹 캐시임.
2. 반복된 요청을 캐싱함으로 웹서버의 속도를 향상시키는 것부터, 네트워크 자원을 공유하려는 사람들에게 웹, DNS와 다른 네트워크 검색의 캐싱을 제공하고, 트래픽을 걸러줌으로써 안정성에 도움을 주는 등에 이르기까지 광범위하게 이용됨.[root@localhost /]# vi /etc/squid/squid.conf 1 # 2 # Recommended minimum configuration: 3 # 4 5 # Example rule allowing access from your local networks. 6 # Adapt to list your (internal) IP networks from where browsing 7 # should be allowed 8 acl localnet src 0.0.0.1-0.255.255.255 # RFC 1122 "this" network (LAN) 9 acl localnet src 10.0.0.0/8 # RFC 1918 local private network (LAN) 10 acl localnet src 100.64.0.0/10 # RFC 6598 shared address space (CGN) 11 acl localnet src 169.254.0.0/16 # RFC 3927 link-local (directly plugged) machines 12 acl localnet src 172.16.0.0/12 # RFC 1918 local private network (LAN) 13 acl localnet src 192.168.0.0/16 # RFC 1918 local private network (LAN) 14 acl localnet src fc00::/7 # RFC 4193 local private network range 15 acl localnet src fe80::/10 # RFC 4291 link-local (directly plugged) machines ...(생략) 28 acl CONNECT method CONNECT 29 acl proxycentos src 192.168.111.0/255.255.255.0 --> 추가 30 # 31 # Recommended minimum Access Permission configuration: 32 # 33 # Deny requests to certain unsafe ports 34 http_access deny !Safe_ports▶ 리눅스 서버#1(프록시 서버)에서 /etc/squid/squid.conf 파일에서 29번 line에 acl proxycentos src 192.168.111.0/255.255.255.0을 추가합니다. acl 접근제어에 192.168.111 대역 모두를 허용하겠다는 의미입니다.
     40 http_access allow localhost manager
     41 http_access deny manager
     42
     43 # We strongly recommend the following be uncommented to protect innocent
     44 # web applications running on the proxy server who think the only
     45 # one who can access services on "localhost" is a local user
     ...(생략)
     52 # Example rule allowing access from your local networks.
     53 # Adapt localnet in the ACL section to list your (internal) IP networks
     54 # from where browsing should be allowed
     55 http_access allow localnet
     56 http_access allow localhost
     57 http_access allow proxycentos
     58 # And finally deny all other access to this proxy
     59 http_access deny all
▶ 리눅스 서버#1(프록시 서버)에서 /etc/squid/squid.conf 파일에서 57번 line에 http-access allow proxytcentos를 추가합니다.
     55 http_access allow localnet
     56 http_access allow localhost
     57 http_access allow proxycentos
     58 # And finally deny all other access to this proxy
     59 http_access deny all
     60
     61 # Squid normally listens to port 3128
     62 http_port 3128
     63
     64 # Uncomment and adjust the following to add a disk cache directory.
     65 cache_dir ufs /var/spool/squid 1000 32 256 -> 기존 100에서 1000으로 변경, 16에서 32로 변경
     66
     67 # Leave coredumps in the first cache dir
     68 coredump_dir /var/spool/squid
▶ 리눅스 서버#1(프록시 서버)에서 /etc/squid/squid.conf 파일에서 65번 line에 cache_dir ufs /var/spool/squid 100 16 256을 1000 32 256으로 변경을 합니다.
1000은 MB의 의미로 용량을 저장할 수 있는 용량을 의미하고 32의 경우는 디렉터리를 만들 수 있는 하위 디렉토리 256은 그 밑에 만들수 있는 하위 디렉터리를 의미합니다.70 # 71 # Add any of your own refresh_pattern entries above these. 72 # 73 refresh_pattern ^ftp: 1440 20% 10080 74 refresh_pattern ^gopher: 1440 0% 1440 75 refresh_pattern -i (/cgi-bin/|\?) 0 0% 0 76 refresh_pattern . 0 20% 4320 77 visible_hostname proxycentos▶ 리눅스 서버#1(프록시 서버)에서 /etc/squid/squid.conf 파일에서 마지막 line에 visible_hostname proxycentos를 추가합니다.
[root@localhost /]# systemctl status firewalld | grep -i Active
Active: active (running) since Sun 2022-07-10 17:05:53 KST; 12min ago

[root@localhost /]# firewall-cmd --permanent --add-port=3128/tcp
success

[root@localhost /]# firewall-cmd --reload
success
▶ squid 서비스 3128 포트를 사용하기 때문에 방화벽에서 3128포트를 활성화합니다.
[root@localhost /]# firewall-cmd --list-all
public (active)
  target: default
  icmp-block-inversion: no
  interfaces: ens160
  sources:
  services: cockpit dhcpv6-client ssh
  ports: 3128/tcp
  protocols:
  masquerade: no
  forward-ports:
  source-ports:
  icmp-blocks:
  rich rules:
▶squid 서비스 3128 포트가 추가된 것을 확인합니다.

▶ 리눅스 서버#2에서 FireFox 웹 콘솔을 오픈한 뒤 Preferences 항목을 선택합니다.

▶ 리눅스 서버#2에서 Network Proxy 설정을 위해서 설정 항목을 클릭합니다.
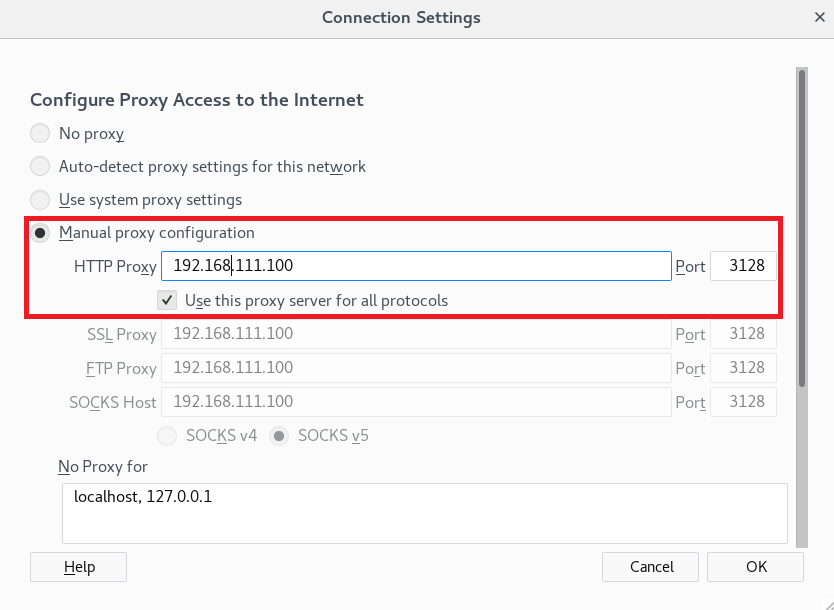
▶ 리눅스 서버#2에서 Manual proxy settings 항목에 HTTP Proxy 설정에 192.168.111.100 프록시 서버 아이피 주소를 넣고 서비스 포트를 3128로 지정합니다.

▶ 리눅스 서버#2에서 프록시 서버를 통해서 구글 홈페이지 접속 시도를 했을때 연결이 되지 않습니다. 이때 프록시 서버에서 squid 서비스를 재시작하도록 합니다.
[root@localhost /]# systemctl restart squid

[root@localhost /]# systemctl status squid | grep -i Active
   Active: active (running) since Sun 2022-07-10 17:29:59 KST; 28s ago
▶ 리눅스 서버#1(프록시 서버)에서 squid 서비스를 재시작합니다.

▶ squid 서비스를 재시작 후 리눅스 서버#2에서 구글 웹페이지 도메인이 설정된 192.168.111.100을 통해서 전달받아 호출된 것을 확인할 수 있습니다.

▶ 윈도우 서버#3에서 네트워크 설정에서 프록시 항목을 선택합니다.
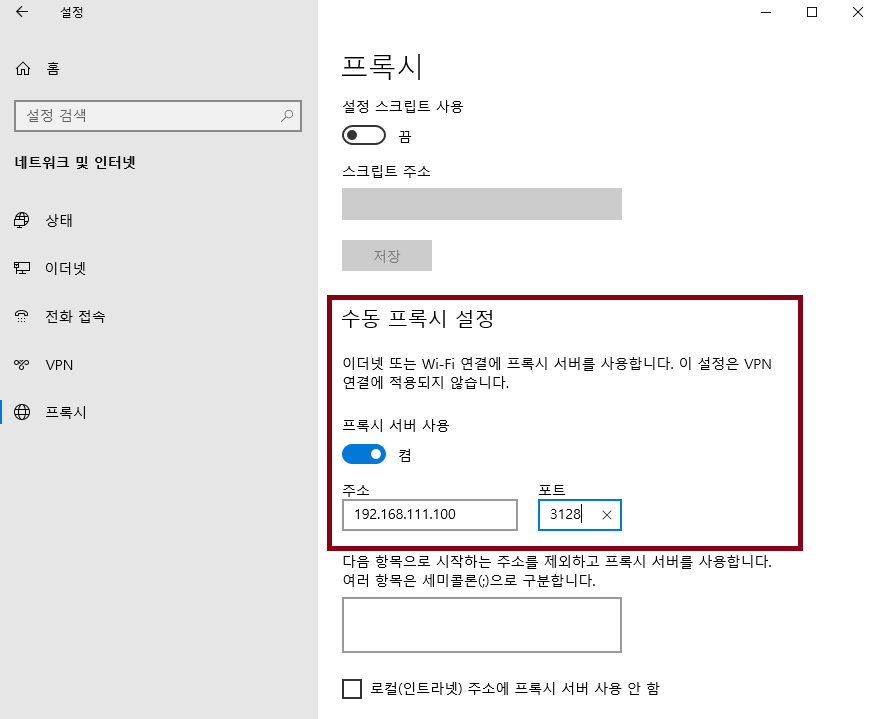
▶ 윈도우 서버#3에서 수동 프록시 설정을 선택하고 192.168.111.100 프록시 주소를 설정하고 서비스 포트 3128로 설정을 합니다.

▶ 윈도우 서버#3에서 구글 홈페이지 도메인이 프록시 서버를 통해 전달받아 호출된 것을 확인할 수 있습니다.
2022.06.20 - [System of Infra/LINUX] - LINUX DNS(캐싱전용)서버 구축하기
LINUX DNS(캐싱전용)서버 구축하기
LINUX DNS(캐싱전용)서버 구축하기 [root@localhost /]# cat /etc/nsswitch.conf | grep -i hosts # hosts: files dns # hosts: files dns # from user file hosts: files dns myhostname /etc/hosts.conf orde..
pinetreeday.tistory.com
2022.06.23 - [System of Infra/LINUX] - LINUX DNS(마이네임전용)서버 구축하기
LINUX DNS(마이네임전용)서버 구축하기
LINUX DNS(마이네임전용)서버 구축하기 [root@localhost /]# cat /etc/nsswitch.conf | grep -i hosts # hosts: files dns # hosts: files dns # from user file hosts: files dns myhostname /etc/hosts.conf..
pinetreeday.tistory.com
2022.05.17 - [System of Infra/LINUX] - LINUX Telnet 서버 구축 하는 방법 [원격지 서버 1편]
LINUX Telnet 서버 구축 하는 방법 [원격지 서버 1편]
LINUX Telnet 서버 구축하는 방법 [원격지 서버 1편] [root@localhost /]# ip a 1: lo: mtu 65536 qdisc noqueue state UNKNOWN group default qlen 1000 link/loopback 00:00:00:00:00:00 brd 00:00:00:00:00:..
pinetreeday.tistory.com
2022.05.18 - [System of Infra/LINUX] - LINUX SSH 서버 구축 하는 방법 [원격지 서버 2편]
LINUX SSH 서버 구축 하는 방법 [원격지 서버 2편]
LINUX SSH 서버 구축하는 방법 [원격지 서버 2편] [root@localhost ~]# ip a 1: lo: mtu 65536 qdisc noqueue state UNKNOWN group default qlen 1000 link/loopback 00:00:00:00:00:00 brd 00:00:00:00:0..
pinetreeday.tistory.com
2022.05.19 - [System of Infra/LINUX] - LINUX XRDP 서버 구축 하는 방법 [원격지 서버 3편]
LINUX XRDP 서버 구축 하는 방법 [원격지 서버 3편]
LINUX XRDP 서버 구축하는 방법 [원격지 서버 3편] [root@localhost /]# ip a 1: lo: mtu 65536 qdisc noqueue state UNKNOWN group default qlen 1000 link/loopback 00:00:00:00:00:00 brd 00:00:00:00:..
pinetreeday.tistory.com
PS. 포스팅의 내용은 제 기준으로 작성한 것이기 때문에 참고해서 보시면 감사하겠습니다.
포스팅 과정의 오류 및 오타 그리고 궁금한 점에 대해서는 댓글 남겨주세요.
728x90반응형'System of Infra > Linux System' 카테고리의 다른 글
LINUX 방화벽(Firewall)서버 구축하는 방법[2편] (8) 2022.07.14 LINUX 방화벽(Firewall)서버 구축하는 방법[1편] (2) 2022.07.13 LINUX NFS서버 구축하는 방법 (12) 2022.07.09 LINUX SMB 리눅스 공유볼륨 윈도우 드라이브 연결하기 (2) 2022.07.08 LINUX SMB 윈도우 공유볼륨 리눅스에 마운트하는 방법 (2) 2022.07.08