-
LINUX SMB 리눅스 공유볼륨 윈도우 드라이브 연결하기System of Infra/Linux System 2022. 7. 8. 20:04728x90반응형

LINUX SMB 리눅스 공유 볼륨 윈도우 드라이브 연결하기
★Samba [SMB]에 대한 설명
1. Window서버와 LInux/Unix 서버 간의 파일 공유를 위해서 개발된 프로토콜
2. Linux에서 Window 또는 Window에서 Linux로 자원을 공유하여 사용하는 방식일 때 사용
3. 즉 SMB는 네트워크 상 존재하는 노드들 간에 자원을 공유할 수 있도록 설계된 프로토콜
리눅스 서버 : 192.168.111.100
윈도우서버 : 192.168.111.128[root@localhost /]# dnf -y install samba 마지막 메타 데이터 만료 확인 : 19:36:22 전에 2022년 07월 07일 (목) 오후 11시 09분 01초. 종속성이 해결되었습니다. ======================================================================================================== 꾸러미 아키텍처 버전 리포지토리 크기 ======================================================================================================== Installing: samba x86_64 4.9.1-8.el8 BaseOS 708 k 종속성 설치: samba-common-tools x86_64 4.9.1-8.el8 BaseOS 461 k samba-libs x86_64 4.9.1-8.el8 BaseOS 177 k 거래 요약 ======================================================================================================== 설치 3 꾸러미 총 다운로드 크기 : 1.3 M 설치 크기 : 3.5 M 패키지 다운로드중: (1/3): samba-libs-4.9.1-8.el8.x86_64.rpm 40 kB/s | 177 kB 00:04 (2/3): samba-4.9.1-8.el8.x86_64.rpm 141 kB/s | 708 kB 00:05 (3/3): samba-common-tools-4.9.1-8.el8.x86_64.rpm 70 kB/s | 461 kB 00:06 -------------------------------------------------------------------------------------------------------- 합계 203 kB/s | 1.3 MB 00:06 트랜잭션 점검 실행 중 트랜잭션 검사가 성공했습니다. 트랜잭션 테스트 실행 중 트랜잭션 테스트가 완료되었습니다. 거래 실행 중 준비 중입니다 : 1/1 Installing : samba-libs-4.9.1-8.el8.x86_64 1/3 스크립틀릿 실행: samba-libs-4.9.1-8.el8.x86_64 1/3 Installing : samba-common-tools-4.9.1-8.el8.x86_64 2/3 Installing : samba-4.9.1-8.el8.x86_64 3/3 스크립틀릿 실행: samba-4.9.1-8.el8.x86_64 3/3 확인 중 : samba-4.9.1-8.el8.x86_64 1/3 확인 중 : samba-common-tools-4.9.1-8.el8.x86_64 2/3 확인 중 : samba-libs-4.9.1-8.el8.x86_64 3/3 설치됨: samba-4.9.1-8.el8.x86_64 samba-common-tools-4.9.1-8.el8.x86_64 samba-libs-4.9.1-8.el8.x86_64 완료되었습니다!▶ 리눅스 서버에 samba 패키지를 설치합니다. 버전은 samba-4.9.1-8.el8.x86_64
[root@localhost /]# mkdir share

[root@localhost log]# cp vmware* /share/

[root@localhost share]# ls -ltr
합계 80
-rw------- 1 root root  1420  7월  8 18:53 vmware-network.1.log
-rw------- 1 root root  1120  7월  8 18:53 vmware-network.2.log
-rw------- 1 root root  1420  7월  8 18:53 vmware-network.3.log
-rw------- 1 root root   739  7월  8 18:53 vmware-network.4.log
-rw------- 1 root root  1420  7월  8 18:53 vmware-network.6.log
-rw------- 1 root root  1120  7월  8 18:53 vmware-network.5.log
-rw------- 1 root root   761  7월  8 18:53 vmware-network.8.log
-rw------- 1 root root   739  7월  8 18:53 vmware-network.7.log
-rw------- 1 root root  1121  7월  8 18:53 vmware-network.log
-rw------- 1 root root   739  7월  8 18:53 vmware-network.9.log
-rw-r--r-- 1 root root 22123  7월  8 18:53 vmware-vmsvc.log
-rw------- 1 root root  7782  7월  8 18:53 vmware-vgauthsvc.log.0
-rw-r--r-- 1 root root  6590  7월  8 18:53 vmware-vmusr.log
▶ mkdir 명령어로 share 디렉터리를 한 개 생성하고 /var/log 밑에 있는 vmware로 시작하는 파일들을 share 디렉터리에 복사합니다.(윈도우 서버에서 드라이브 연결 시 이 파일들이 보이는지 확인하기 위함)
[root@localhost share]# groupadd sambagroup

[root@localhost share]# cat /etc/group | grep -i sam
sambagroup:x:1001:
▶ groupadd 명령어를 통해서 sambabroup를 생성합니다.
[root@localhost /]# ls -al | grep -i share
drwxr-xr-x    2 root root 4096  7월  8 18:53 share

[root@localhost /]# chgrp sambagroup /share/

[root@localhost /]# ls -al | grep -i share
drwxr-xr-x    2 root sambagroup 4096  7월  8 18:53 share
▶ chgrp 명령어를 통해서 share 디렉토리의 그룹을 sambagroup로 변경합니다.
[root@localhost /]# chmod 770 share

[root@localhost /]# ls -al | grep -i share
drwxrwx---    2 root sambagroup 4096  7월  8 18:53 share
▶ chmod 명령어를 통해서 share 권한을 770으로 변경합니다. 소유자와 그룹은 읽기/쓰기/실행 가능
[root@localhost /]# useradd shareuser

[root@localhost /]# usermod -G sambagroup shareuser

[root@localhost /]# cat /etc/group | grep -i sambagroup
sambagroup:x:1001:shareuser
▶ samba 계정으로 사용하기 위한 계정생성을 위해 shareuser라는 계정을 생성합니다. 생성 후 sambagroup에 shareuser를 추가합니다.
[root@localhost /]# smbpasswd -a shareuser
New SMB password: ****
Retype new SMB password: ****
Added user shareuser.
▶ 생성된 samba 계정인 shareruser의 패스워드를 지정합니다.(네트워크 드라이브 연결 시 사용되는 패스워드)

▶ 윈도우 서버에 작업그룹의 이름 설정이 어떻게 되어 있는지 확인을 합니다. 작업그룹 : WORKGROUP
[root@localhost /]# vi /etc/samba/smb.conf
# See smb.conf.example for a more detailed config file or
# read the smb.conf manpage.
# Run 'testparm' to verify the config is correct after
# you modified it.

[global]
        workgroup = SAMBA -->workgorup 변경
        unix charset = UTF-8 -->추가
        map to guest = Bad User -->추가
        security = user

        passdb backend = tdbsam

        printing = cups
        printcap name = cups
        load printers = yes
        cups options = raw

[homes]
        comment = Home Directories
        valid users = %S, %D%w%S
        browseable = No
        read only = No
        inherit acls = Yes

[printers]
        comment = All Printers
        path = /var/tmp
        printable = Yes
        create mask = 0600
        browseable = No

[print$]
        comment = Printer Drivers
        path = /var/lib/samba/drivers
        write list = @printadmin root
        force group = @printadmin
        create mask = 0664
        directory mask = 0775

[Share] -->추가
	path = /share -->추가
	writable = yes -->추가
	guest ok = no -->추가
	create mode = 0777 -->추가
	directory mode = 0777 -->추가
	valid users = @sambagroup -->추가
▶ /etc/samba/smb.conf 파일에 아래와 같은 내용을 추가합니다.
★/etc/samba/smb.conf 파일 추가 내용
workgroup = SAMBA --> workgorup 변경
unix charset = UTF-8 --> 추가
map to guest = Bad User -->추가
[Share] -->추가 #공유되는 디렉토리 대한 설명
path = /share -->추가 #물리적인 디렉토리
writable = yes -->추가 #쓰기가 가능하도록 여부
guest ok = no -->추가 #다른사용자도 사용하게 할지 여부
create mode = 0777 -->추가
directory mode = 0777 -->추가
valid users = @sambagroup -->추가 #허용되는 유저가 소속된 그룹[root@localhost /]# testparm Load smb config files from /etc/samba/smb.conf rlimit_max: increasing rlimit_max (1024) to minimum Windows limit (16384) Processing section "[homes]" Processing section "[printers]" Processing section "[print$]" Processing section "[Share]" Loaded services file OK. Server role: ROLE_STANDALONE Press enter to see a dump of your service definitions▶ testparm 명령어를 사용하게 되면 /etc/samba/smb.conf 파일이 올바르게 작성되었는지 체크를 하게 됩니다. 정상적이지 않게 되면 에러메시지를 호출하고 정상적일경우 Loaded services file OK. 메세지를 호출합니다.
[root@localhost /]# systemctl restart smb
[root@localhost /]# systemctl restart nmb

[root@localhost /]# systemctl enable nmb
Created symlink /etc/systemd/system/multi-user.target.wants/nmb.service → /usr/lib/systemd/system/nmb.service.
[root@localhost /]# systemctl enable smb
Created symlink /etc/systemd/system/multi-user.target.wants/smb.service → /usr/lib/systemd/system/smb.service.
▶ smb 데몬을 재기동하고 재부팅 후에도 활성화되도록 enable 합니다.
[root@localhost /]# systemctl status firewalld | grep -i Active
   Active: active (running) since Thu 2022-07-07 22:56:24 KST; 20h ago

[root@localhost /]# systemctl stop firewalld

[root@localhost /]# systemctl status firewalld | grep -i Active
   Active: inactive (dead) since Fri 2022-07-08 19:16:52 KST; 4s ago
▶ 방화벽이 올라가 있는 상태에서 smb 관련 포트를 열어주어야 하지만 이번 테스트에서는 성공이 목적임으로 방화벽을 일시적으로 내려 모든 포트를 allow 하겠다는 가정을 하겠습니다.
*SMB 관련 포트는 137(UDP), 138(UDP), 139(TCP), 445(TCP)다.
▶ 윈도우서버에서 내 컴퓨터-> 네트워크 드라이브 연결을 합니다.

▶ 리눅스 서버의 아이피 192.168.111.100에 share 디렉터리를 연결합니다.

▶ 리눅스 서버에서 생성한 samba 계정인 shareruser 계정명을 입력하고 지정된 패스워드를 입력합니다.

▶ 네트워크 드라이브 연결이 완료가 되면 192.168.111.100 리눅스 서버의 share 디렉터리에 있던 vmware로 시작하는 파일들이 윈도우 서버에서도 보이는 것을 확인할 수 있습니다.
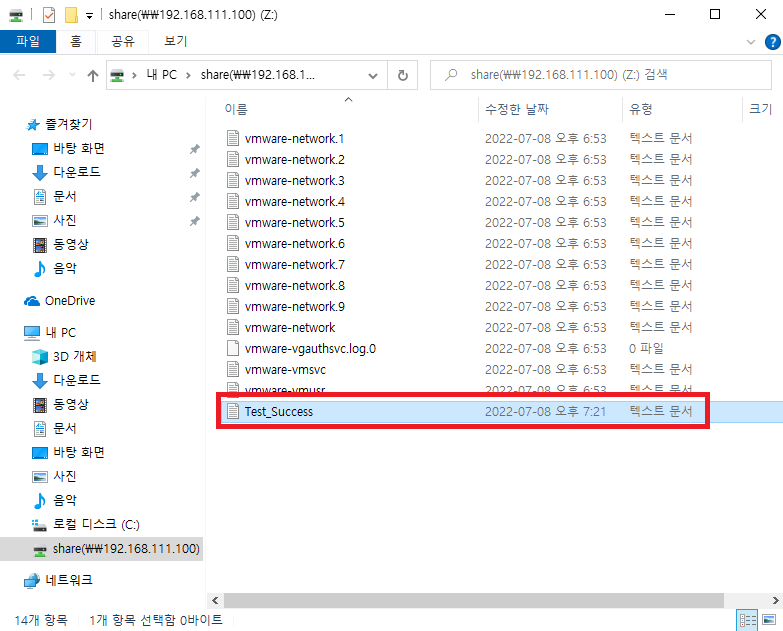
▶ 공유 볼륨 디렉터리에 Test_Success라는 텍스트 파일 하나를 생성합니다.
[root@localhost share]# ls -ltr
합계 80
-rw------- 1 root      root       1420  7월  8 18:53 vmware-network.1.log
-rw------- 1 root      root       1120  7월  8 18:53 vmware-network.2.log
-rw------- 1 root      root       1420  7월  8 18:53 vmware-network.3.log
-rw------- 1 root      root        739  7월  8 18:53 vmware-network.4.log
-rw------- 1 root      root       1420  7월  8 18:53 vmware-network.6.log
-rw------- 1 root      root       1120  7월  8 18:53 vmware-network.5.log
-rw------- 1 root      root        761  7월  8 18:53 vmware-network.8.log
-rw------- 1 root      root        739  7월  8 18:53 vmware-network.7.log
-rw------- 1 root      root       1121  7월  8 18:53 vmware-network.log
-rw------- 1 root      root        739  7월  8 18:53 vmware-network.9.log
-rw-r--r-- 1 root      root      22123  7월  8 18:53 vmware-vmsvc.log
-rw------- 1 root      root       7782  7월  8 18:53 vmware-vgauthsvc.log.0
-rw-r--r-- 1 root      root       6590  7월  8 18:53 vmware-vmusr.log
-rwxrw-rw- 1 shareuser shareuser     0  7월  8 19:21 Test_Success.txt
▶ 리눅스 서버에서도 Test_Success.txt 파일이 존재하는것을 확인할 수 있습니다.
[root@localhost /]# smbstatus
Samba version 4.9.1
PID     Username     Group        Machine                                   Protocol Version  Encryption           Signing
----------------------------------------------------------------------------------------------------------------------------------------
6716    shareuser    shareuser    192.168.111.128 (ipv4:192.168.111.128:51989) SMB3_11           -                    partial(AES-128-CMAC)

Service      pid     Machine       Connected at                     Encryption   Signing
---------------------------------------------------------------------------------------------
Share        6716    192.168.111.128 금  7월  8 19시 20분 57초 2022 KST -            -

Locked files:
Pid          Uid        DenyMode   Access      R/W        Oplock           SharePath   Name   Time
--------------------------------------------------------------------------------------------------
6716         1001       DENY_NONE  0x100081    RDONLY     NONE             /share   .   Fri Jul  8 19:21:31 2022
6716         1001       DENY_NONE  0x100081    RDONLY     NONE             /share   .   Fri Jul  8 19:21:47 2022
6716         1001       DENY_NONE  0x100081    RDONLY     NONE             /share   .   Fri Jul  8 19:21:47 202
▶ 리눅스 서버에서 smbstatus 명령어를 치게 되면 현재 어떤 아이피의 윈도우 서버에서 어떤 디렉토리를 공유하여 사용하고 있는지 확인할 수 있습니다.
2022.07.08 - [System of Infra/LINUX] - LINUX SMB 윈도우 공유볼륨 리눅스에 마운트하는 방법
LINUX SMB 윈도우 공유볼륨 리눅스에 마운트하는 방법
LINUX SMB 윈도우 공유볼륨 리눅스에 마운트하는 방법 ★Samba [SMB]에 대한 설명 1. Window서버와 LInux/Unix 서버 간의 파일 공유를 위해서 개발된 프로토콜 2. Linux에서 Window 또는 Window에서 Linux..
pinetreeday.tistory.com
PS. 포스팅의 내용은 제 기준으로 작성한 것이기 때문에 참고해서 보시면 감사하겠습니다.
포스팅 과정의 오류 및 오타 그리고 궁금한 점에 대해서는 댓글 남겨주세요.
728x90반응형'System of Infra > Linux System' 카테고리의 다른 글
LINUX PROXY(프록시)서버 구현하는 방법 (18) 2022.07.11 LINUX NFS서버 구축하는 방법 (12) 2022.07.09 LINUX SMB 윈도우 공유볼륨 리눅스에 마운트하는 방법 (2) 2022.07.08 LINUX PXE서버구축을 통한 OS 설치하는 방법 (6) 2022.07.06 LINUX NMAP 패키지를 활용한 포트 상태 확인하는 방법 (8) 2022.06.28