-
DB Oracle21 ASM + RAC 환경 구축하기(With. ORACLE ASM 구성) 4편Programming and Database/SQL 2024. 6. 12. 01:00728x90반응형

Oracle Database 이미지 ▣ DB Oracle ASM + RAC 환경 구축하기(With. ORACLE ASM 구성) 4편
※ ORACLE ASM + RAC 구성 실습을 위한 사전 준비 사항
01. 실습환경 : Oracle VM VirtualBox 7.0
■ Download URL : https://www.virtualbox.org/
02. 테스트용 서버 : Oracle Linux 8.7
■ Download URL : https://yum.oracle.com/oracle-linux-isos.html
03. 테스트에 사용될 IP 구성 정보
■ 리눅스서버#1(ol8rac1) vip : 192.168.0.163
■ 리눅스서버#2(ol8rac2) vip : 192.168.0.164
■ 리눅스서버#1(ol8rac1) real ip : 192.168.0.161
■ 리눅스서버#2(ol8rac2) real ip : 192.168.0.162
■ 리눅스서버#1(ol8rac1) priv ip : 192.168.56.161
■ 리눅스서버#2(ol8rac2) priv ip : 192.168.56.162
■ 리눅스서버#1(ol8rac1) , 리눅스서버#2(ol8rac2) scan ip : 192.168.0.165
04. 테스트에 사용될 디스크 구성 정보
■ 리눅스서버#1(ol8rac1) , 리눅스서버#2(ol8rac2) 공유스토리지 2EA : 각 25GB
DB Oracle ASM + RAC 환경 구축하기(With. ORACLE ASM 구성) 4편 ▶ ol8rac1을 복제하여 ol8rac2 노드를 구성했기 때문에 앞선 포스팅을 통해서 MAC ADDRESS 충돌을 피하기 위해 인터페이스 설정도 별도로 구성한 것을 확인할 수 있습니다. ol8rac1을 복제했기 때문에 기존의 1호기 IP 설정이 그대로 복제되어 2호기의 IP로 변경을 합니다.(ol8rac2 Real IP : 192.168.0.162)
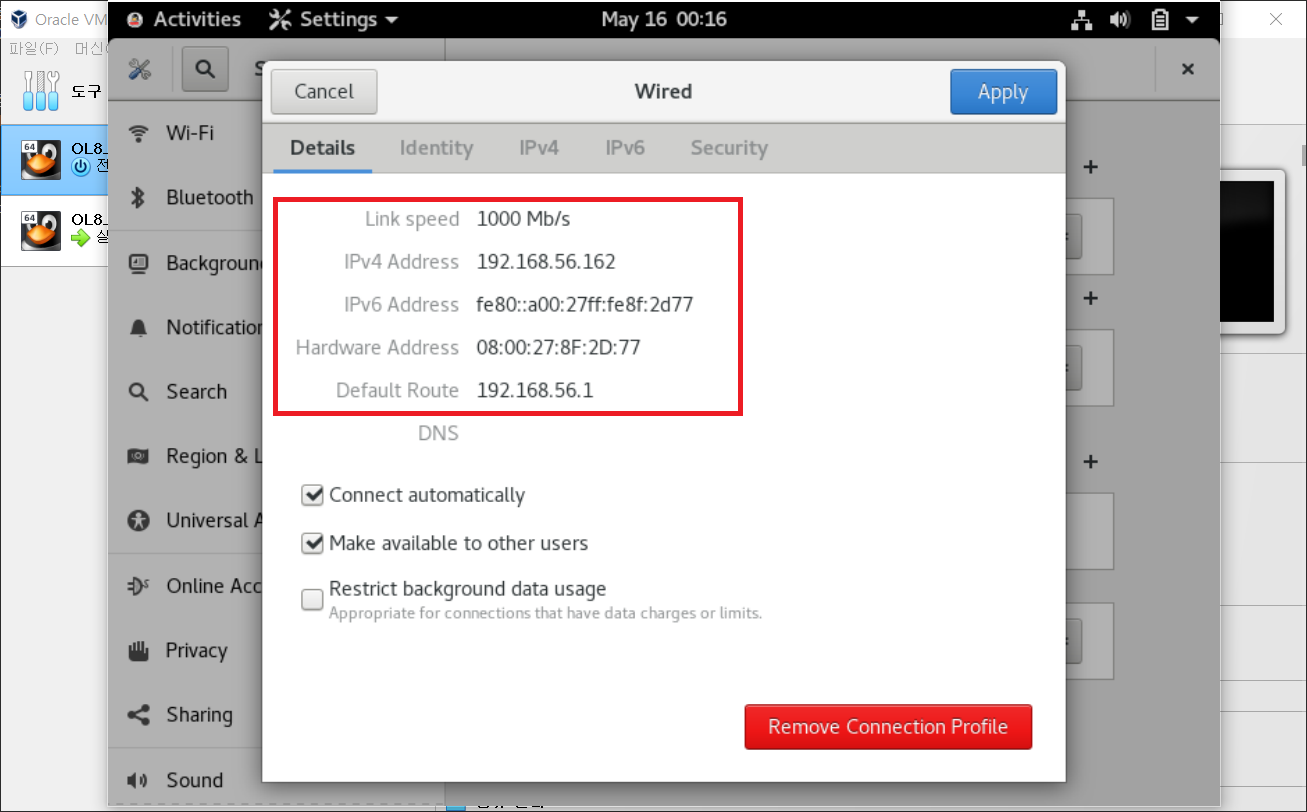
DB Oracle ASM + RAC 환경 구축하기(With. ORACLE ASM 구성) 4편 ▶ ol8rac1을 복제하여 ol8rac2 노드를 구성했기 때문에 앞선 포스팅을 통해서 MAC ADDRESS 충돌을 피하기 위해 인터페이스 설정도 별도로 구성한 것을 확인할 수 있습니다. ol8rac1을 복제했기 때문에 기존의 1호기 IP 설정이 그대로 복제되어 2호기의 IP로 변경을 합니다. (ol8rac2 PRIV IP : 192.168.56.162)
## 오라클 리눅스#2(ol8rac2) 작업
[root@ol8rac2 ~]# hostnamectl set-hostname ol8rac2

[root@ol8rac2 ~]# hostnamectl set-hostname ol8rac2 --pretty

[root@ol8rac2 ~]# hostnamectl set-hostname ol8rac2 --static

[root@ol8rac2 ~]# hostnamectl set-hostname ol8rac2 --transient

[root@ol8rac2 ~]# hostname
ol8rac2
▶ ol8rac2 노드의 hostname을 변경합니다.
## 오라클 리눅스#1(ol8rac1) 작업
[root@ol8rac1 ~]# ip addr | grep -i 161
    inet 192.168.0.161/24 brd 192.168.0.255 scope global noprefixroute enp0s3
    inet 192.168.56.161/24 brd 192.168.56.255 scope global noprefixroute enp0s8

## 오라클 리눅스#2(ol8rac2) 작업
[root@ol8rac2 ~]# ip addr | grep -i 162
    inet 192.168.0.162/24 brd 192.168.0.255 scope global noprefixroute enp0s3
    inet 192.168.56.162/24 brd 192.168.56.255 scope global noprefixroute enp0s8
▶ ol8rac1, ol8rac2 노드의 IP 설정을 확인하면, RAC 구성에 필요한 준비사항이 반영되어 있는 것을 확인할 수 있습니다.
## 오라클 리눅스#1(ol8rac1) 작업
[root@ol8rac1 ~]# ping 192.168.0.162
PING 192.168.0.162 (192.168.0.162) 56(84) bytes of data.
64 bytes from 192.168.0.162: icmp_seq=1 ttl=64 time=1.76 ms
64 bytes from 192.168.0.162: icmp_seq=2 ttl=64 time=0.532 ms
64 bytes from 192.168.0.162: icmp_seq=3 ttl=64 time=0.500 ms

--- 192.168.0.162 ping statistics ---
5 packets transmitted, 3 received, 0% packet loss, time 4132ms
rtt min/avg/max/mdev = 0.449/0.767/1.763/0.500 ms

## 오라클 리눅스#2(ol8rac2) 작업
[root@ol8rac2 ~]# ping 192.168.0.161
PING 192.168.0.1 (192.168.0.1) 56(84) bytes of data.
64 bytes from 192.168.0.1: icmp_seq=1 ttl=64 time=15.0 ms
64 bytes from 192.168.0.1: icmp_seq=2 ttl=64 time=5.69 ms
64 bytes from 192.168.0.1: icmp_seq=3 ttl=64 time=6.49 ms

--- 192.168.0.1 ping statistics ---
3 packets transmitted, 3 received, 0% packet loss, time 2201ms
rtt min/avg/max/mdev = 5.691/9.064/15.012/4.219 ms
▶ol8rac1 -> ol8rac2 Real IP ping 체크를 통해서 ICMP 테스트를 진행합니다. 추가적으로 Priv IP 대역도 ping 체크를 통해서 확인합니다.
## 오라클 리눅스#1(ol8rac1) 작업
[root@ol8rac1 ~]# grubby --help
Usage: grubby [OPTION...]
      --add-kernel=kernel-path            add an entry for the specified kernel
      --args=args                         default arguments for the new kernel or new arguments for kernel being updated)
      --bad-image-okay                    don't sanity check images in boot entries (for testing only)
  -c, --config-file=path                  path to grub config file to update ("-" for stdin)
      --copy-default                      use the default boot entry as a template for the new entry being added; if the default is not a linux image, or if the kernel referenced by the default image does not exist, the
                                          first linux entry whose kernel does exist is used as the template
      --default-kernel                    display the path of the default kernel
      --default-index                     display the index of the default kernel
      --default-title                     display the title of the default kernel
      --env=path                          path for environment data
      --grub2                             configure grub2 bootloader
      --info=kernel-path                  display boot information for specified kernel
      --initrd=initrd-path                initrd image for the new kernel
  -i, --extra-initrd=initrd-path          auxiliary initrd image for things other than the new kernel
      --make-default                      make the newly added entry the default boot entry
      --remove-args=STRING                remove kernel arguments
      --remove-kernel=kernel-path         remove all entries for the specified kernel
      --set-default=kernel-path           make the first entry referencing the specified kernel the default
      --set-default-index=entry-index     make the given entry index the default entry
      --title=entry-title                 title to use for the new kernel entry
      --update-kernel=kernel-path         updated information for the specified kernel
      --zipl                              configure zipl bootloader
  -b, --bls-directory                     path to directory containing the BootLoaderSpec fragment files
      --no-etc-grub-update                don't update the GRUB_CMDLINE_LINUX variable in /etc/default/grub

Help options:
  -?, --help                              Show this help message
▶ Oracle Linux 8.7 최초 설치 시 부팅 과정에서 Redhat 이미지 배포판을 가져와 커스터마이징 했기 때문에 부팅 시 과정을 한번 확인합니다. grubby 명령어를 통해서 현재 운영체제의 커널부팅이 어떤 이미지로 부팅되어 있는지 확인이 가능하고 Defualt 설정도 변경이 가능합니다.(grubby --help 활용)
## 오라클 리눅스#1(ol8rac1) 작업
[root@ol8rac1 ~]# grubby --info=ALL | grep ^kernel
kernel="/boot/vmlinuz-5.15.0-3.60.5.1.el8uek.x86_64"
kernel="/boot/vmlinuz-4.18.0-425.3.1.el8.x86_64"
kernel="/boot/vmlinuz-0-rescue-8ff48dc53c9f44c0bcccb0eabf6d6367"

## 오라클 리눅스#2(ol8rac2) 작업
[root@ol8rac2 ~]# grubby --info=ALL | grep ^kernel
kernel="/boot/vmlinuz-5.15.0-3.60.5.1.el8uek.x86_64"
kernel="/boot/vmlinuz-4.18.0-425.3.1.el8.x86_64"
kernel="/boot/vmlinuz-0-rescue-8ff48dc53c9f44c0bcccb0eabf6d6367"
▶ ol8rac1, ol8rac2 두 노드를 grubby 명령어를 통해서 커널 부팅 순서를 확인했을 때, el8uek로 시작되는 부팅이미지가 상단에 위치하여 Default 인 것을 확인할 수 있습니다. 해당 이미지는 오라클에서 Redhat 이미지를 커스텀하여 만든 이미지로 asmlib 패키지 설치 시 오류가 나는 버그가 있어 부팅이미지 순서를 변경해야 합니다.
▣ grubby 커널 부팅 이미지 요약
kernel="/boot/vmlinuz-5.15.0-3.60.5.1.el8uek.x86_64" -> ORACLE에서 커스터마이징 한 리눅스 8.7 image
kernel="/boot/vmlinuz-4.18.0-425.3.1.el8.x86_64" -> Redhat Default 리눅스 8.7 image
kernel="/boot/vmlinuz-0-rescue-8ff48dc53c9f44c0bcccb0eabf6d6367" -> 긴급복구 image## 오라클 리눅스#1(ol8rac1) 작업 [root@ol8rac1 ~]# grubby --set-default-index=/boot/vmlinuz-4.18.0-425.3.1.el8.x86_64 The default is /boot/loader/entries/8ff48dc53c9f44c0bcccb0eabf6d6367-4.18.0-425.3.1.el8.x86_64.conf with index 1 and kernel /boot/vmlinuz-4.18.0-425.3.1.el8.x86_64 [root@ol8rac1 ~]# grubby --remove-kernel=/boot/vmlinuz-5.15.0-3.60.5.1.el8uek.x86_64 ## 오라클 리눅스#2(ol8rac2) 작업 [root@ol8rac2 ~]# grubby --set-default-index=/boot/vmlinuz-4.18.0-425.3.1.el8.x86_64 The default is /boot/loader/entries/8ff48dc53c9f44c0bcccb0eabf6d6367-4.18.0-425.3.1.el8.x86_64.conf with index 1 and kernel /boot/vmlinuz-4.18.0-425.3.1.el8.x86_64 [root@ol8rac2 ~]# grubby --remove-kernel=/boot/vmlinuz-5.15.0-3.60.5.1.el8uek.x86_64▶ ol8rac1, ol8rac2 두 노드에서 기존 default 설정 커널 부팅 이미지(Oracle 커스터마이징 이미지) 순서를 Redhat 기본 커널이미지 kernel="/boot/vmlinuz-4.18.0-425.3.1.el8.x86_64"로 변경합니다. 변경 후에는 해당 포스트에서는 Oracle 커스터마이징 이미지를 삭제했지만, 필요한 경우 남겨두셔도 됩니다. 해당 작업 완료 후 재부팅합니다.
## 오라클 리눅스#1(ol8rac1) 작업
[root@ol8rac1 yum.repos.d]# ls
oracle-linux-ol8.repo  uek-ol8.repo  virt-ol8.repo

[root@ol8rac1 yum.repos.d]# vi oracle-linux-ol8.repo
[ol8_addons]
name=Oracle Linux 8 Addons ($basearch)
baseurl=https://yum$ociregion.$ocidomain/repo/OracleLinux/OL8/addons/$basearch/
gpgkey=file:///etc/pki/rpm-gpg/RPM-GPG-KEY-oracle
gpgcheck=1
enabled=1

## 오라클 리눅스#2(ol8rac2) 작업
[root@ol8rac2 yum.repos.d]# ls
oracle-linux-ol8.repo  uek-ol8.repo  virt-ol8.repo

[root@ol8rac2 yum.repos.d]# vi oracle-linux-ol8.repo
[ol8_addons]
name=Oracle Linux 8 Addons ($basearch)
baseurl=https://yum$ociregion.$ocidomain/repo/OracleLinux/OL8/addons/$basearch/
gpgkey=file:///etc/pki/rpm-gpg/RPM-GPG-KEY-oracle
gpgcheck=1
enabled=1
▶ol8rac1, ol8rac2 두 노드에서 인터넷이 되는 경우에는 외부 인터페이스 환경의 repo를 통해서 패키지를 가져올 수 있기 때문에 /etc/yum.repos.d 경로에 oracle-linux-ol8.repo 파일을 생성 후 위와 같은 url을 통해서 패키지를 가져올 수 있도록 설정합니다. 폐쇄망의 환경의 경우는 별도의 iso 이미지를 마운트하여 로컬 repo 구성도 가능합니다.
## 오라클 리눅스#1(ol8rac1) 작업
[root@ol8rac1 yum.repos.d]# yum list oracleasm*
Oracle Linux 8 BaseOS Latest (x86_64)                                                                                                             15 kB/s | 3.6 kB     00:00
Oracle Linux 8 BaseOS Latest (x86_64)                                                                                                            8.0 MB/s |  74 MB     00:09
Oracle Linux 8 Application Stream (x86_64)                                                                                                        17 kB/s | 3.9 kB     00:00
Oracle Linux 8 Application Stream (x86_64)                                                                                                       5.4 MB/s |  56 MB     00:10
Oracle Linux 8 Addons (x86_64)                                                                                                                   5.2 MB/s |  14 MB     00:02
Latest Unbreakable Enterprise Kernel Release 7 for Oracle Linux 8 (x86_64)                                                                        13 kB/s | 3.0 kB     00:00
Latest Unbreakable Enterprise Kernel Release 7 for Oracle Linux 8 (x86_64)                                                                       5.2 MB/s |  34 MB     00:06
Last metadata expiration check: 0:00:08 ago on Mon 20 May 2024 11:45:30 PM KST.
Available Packages
oracleasm-support.src                                                                        2.1.12-1.el8                                                                     ol8_addons
oracleasm-support.x86_64                                                                     2.1.12-1.el8                                                                     ol8_addons
▶ ol8rac1 노드에서 yum install oracleasm 패키지를 설치합니다.
## 오라클 리눅스#1(ol8rac1) 작업
[root@ol8rac1 yum.repos.d]# yum search oracleasm
Last metadata expiration check: 0:02:25 ago on Mon 20 May 2024 11:45:30 PM KST.
========================================================================== Name & Summary Matched: oracleasm ===========================================================================
kmod-redhat-oracleasm.src : oracleasm kernel module
kmod-redhat-oracleasm.x86_64 : oracleasm kernel module
kmod-redhat-oracleasm-kernel_4_18_0_240.x86_64 : oracleasm kernel module for kernel version 4.18.0-240.el8..4.18.0-240.14.1.el8_3
kmod-redhat-oracleasm-kernel_4_18_0_240_14_1.x86_64 : oracleasm kernel module for kernel version 4.18.0-240.14.1.el8_3 and higher
kmod-redhat-oracleasm-kernel_4_18_0_425_10_1.x86_64 : oracleasm kernel module for kernel version 4.18.0-425.10.1.el8_7 and higher
kmod-redhat-oracleasm-kernel_4_18_0_425_3_1.x86_64 : oracleasm kernel module for kernel version 4.18.0-425.3.1.el8..4.18.0-425.10.1.el8_7
=============================================================================== Name Matched: oracleasm ================================================================================
oracleasm-support.src : The Oracle Automatic Storage Management support programs.
oracleasm-support.x86_64 : The Oracle Automatic Storage Management support programs.
▶ ol8rac1 노드에서 oracleasm 패키지가 검색이 가능한지 yum search oracleasm 명령어를 통해 확인합니다. 해당 명령어를 통해서 kmon-redhat-oracleasm 패키지를 가져오는 것을 확인할 수 있습니다.
## 오라클 리눅스#1(ol8rac1) 작업
[root@ol8rac1 yum.repos.d]# yum install oracleasm-support
Last metadata expiration check: 0:05:55 ago on Mon 20 May 2024 11:45:30 PM KST.
Dependencies resolved.
========================================================================================================================================================================================
 Package                                           Architecture                           Version                                      Repository                                  Size
========================================================================================================================================================================================
Installing:
 oracleasm-support                                 x86_64                                 2.1.12-1.el8                                 ol8_addons                                  98 k

Transaction Summary
========================================================================================================================================================================================
Install  1 Package

Total download size: 98 k
Installed size: 349 k
Is this ok [y/N]: y
Downloading Packages:
oracleasm-support-2.1.12-1.el8.x86_64.rpm                                                                                                               277 kB/s |  98 kB     00:00
----------------------------------------------------------------------------------------------------------------------------------------------------------------------------------------
...(생략)                                                                                                                   1/1
Installed:
  oracleasm-support-2.1.12-1.el8.x86_64

Complete!

## 오라클 리눅스#2(ol8rac2) 작업
[root@ol8rac2 yum.repos.d]# yum install oracleasm-support
Oracle Linux 8 BaseOS Latest (x86_64)                                                                                                              17 kB/s | 3.6 kB     00:00
Oracle Linux 8 BaseOS Latest (x86_64)                                                                                                             6.8 MB/s |  74 MB     00:10
Oracle Linux 8 Application Stream (x86_64)                                                                                                         16 kB/s | 3.9 kB     00:00
Oracle Linux 8 Application Stream (x86_64)                                                                                                        7.2 MB/s |  56 MB     00:07
Oracle Linux 8 Addons (x86_64)                                                                                                                    6.2 MB/s |  14 MB     00:02
Latest Unbreakable Enterprise Kernel Release 7 for Oracle Linux 8 (x86_64)                                                                         14 kB/s | 3.0 kB     00:00
Latest Unbreakable Enterprise Kernel Release 7 for Oracle Linux 8 (x86_64)                                                                        6.0 MB/s |  34 MB     00:05
Last metadata expiration check: 0:00:07 ago on Mon 20 May 2024 11:53:21 PM KST.
Dependencies resolved.
==================================================================================================================================================================================
 Package                                         Architecture                         Version                                      Repository                                Size
==================================================================================================================================================================================
Installing:
 oracleasm-support                               x86_64                               2.1.12-1.el8                                 ol8_addons                                98 k

Transaction Summary
==================================================================================================================================================================================
Install  1 Package

Total download size: 98 k
Installed size: 349 k
Is this ok [y/N]: y
Downloading Packages:
oracleasm-support-2.1.12-1.el8.x86_64.rpm                                                                                                         278 kB/s |  98 kB     00:00
----------------------------------------------------------------------------------------------------------------------------------------------------------------------------------
...(생략)
Installed:
  oracleasm-support-2.1.12-1.el8.x86_64

Complete!
▶ ol8rac1, ol8rac2 두 노드에서 yum install oracleasm-support를 통해서 oracleasm 패키지지원 rpm을 설치하도록합니다.(설명: https://access.redhat.com/solutions/315643)
## 오라클 리눅스#1(ol8rac1) 작업
[root@ol8rac1 yum.repos.d]# yum install kmod-redhat-oracleasm
Last metadata expiration check: 0:03:27 ago on Mon 20 May 2024 11:51:36 PM KST.
Dependencies resolved.
========================================================================================================================================================================================
 Package                                          Architecture                      Version                                          Repository                                    Size
========================================================================================================================================================================================
Installing:
 kmod-redhat-oracleasm                            x86_64                            8:2.0.8-18.0.1.el8                               ol8_baseos_latest                             44 k
Installing dependencies:
 kernel-core                                      x86_64                            4.18.0-513.24.1.el8_9                            ol8_baseos_latest                             43 M

Transaction Summary
========================================================================================================================================================================================
Install  2 Packages

Total download size: 43 M
Installed size: 71 M
Is this ok [y/N]: y
Downloading Packages:
(1/2): kmod-redhat-oracleasm-2.0.8-18.0.1.el8.x86_64.rpm                                                                                                138 kB/s |  44 kB     00:00
(2/2): kernel-core-4.18.0-513.24.1.el8_9.x86_64.rpm                                                                                                     6.8 MB/s |  43 MB     00:06
----------------------------------------------------------------------------------------------------------------------------------------------------------------------------------------
...(생략)
Installed:
  kernel-core-4.18.0-513.24.1.el8_9.x86_64                                                kmod-redhat-oracleasm-8:2.0.8-18.0.1.el8.x86_64

Complete!

## 오라클 리눅스#2(ol8rac2) 작업
[root@ol8rac2 yum.repos.d]# yum install kmod-redhat-oracleasm
Last metadata expiration check: 0:04:54 ago on Mon 20 May 2024 11:53:42 PM KST.
Dependencies resolved.
==================================================================================================================================================================================
 Package                                        Architecture                    Version                                          Repository                                  Size
==================================================================================================================================================================================
Installing:
 kmod-redhat-oracleasm                          x86_64                          8:2.0.8-18.0.1.el8                               ol8_baseos_latest                           44 k
Installing dependencies:
 kernel-core                                    x86_64                          4.18.0-513.24.1.el8_9                            ol8_baseos_latest                           43 M

Transaction Summary
==================================================================================================================================================================================
Install  2 Packages

Total download size: 43 M
Installed size: 71 M
Is this ok [y/N]: y
Downloading Packages:
(1/2): kmod-redhat-oracleasm-2.0.8-18.0.1.el8.x86_64.rpm                                                                                          154 kB/s |  44 kB     00:00
(2/2): kernel-core-4.18.0-513.24.1.el8_9.x86_64.rpm                                                                                               8.3 MB/s |  43 MB     00:05
----------------------------------------------------------------------------------------------------------------------------------------------------------------------------------
...(생략)
Installed:
  kernel-core-4.18.0-513.24.1.el8_9.x86_64                                             kmod-redhat-oracleasm-8:2.0.8-18.0.1.el8.x86_64

Complete!
▶ ol8rac1, ol8rac2 두 노드에서 yum install kmod-redhat-oracleasm을 통해 oracleasmlib를 설치합니다. (설명: https://access.redhat.com/solutions/315643)
## 오라클 리눅스#1(ol8rac1) 작업
[root@ol8rac1 yum.repos.d]# /usr/sbin/oracleasm configure -i
Configuring the Oracle ASM library driver.

This will configure the on-boot properties of the Oracle ASM library
driver.  The following questions will determine whether the driver is
loaded on boot and what permissions it will have.  The current values
will be shown in brackets ('[]').  Hitting <ENTER> without typing an
answer will keep that current value.  Ctrl-C will abort.

Default user to own the driver interface []: oracle
Default group to own the driver interface []: dba
Start Oracle ASM library driver on boot (y/n) [n]: y
Scan for Oracle ASM disks on boot (y/n) [y]: y
Writing Oracle ASM library driver configuration: done

## 오라클 리눅스#2(ol8rac2) 작업
[root@ol8rac2 yum.repos.d]# /usr/sbin/oracleasm configure -i
Configuring the Oracle ASM library driver.

This will configure the on-boot properties of the Oracle ASM library
driver.  The following questions will determine whether the driver is
loaded on boot and what permissions it will have.  The current values
will be shown in brackets ('[]').  Hitting <ENTER> without typing an
answer will keep that current value.  Ctrl-C will abort.

Default user to own the driver interface []: oracle
Default group to own the driver interface []: dba
Start Oracle ASM library driver on boot (y/n) [n]: y
Scan for Oracle ASM disks on boot (y/n) [y]: y
Writing Oracle ASM library driver configuration: done
▶ol8rac1, ol8rac2 두 노드에서 /usr/sbin/oracleasm configure -i를 수행하여 컨피그 설정을 진행할 수 있습니다.
▣ oracleasm configure 설정
Default user to own the driver interface []: oracle -> asmlib를 수행할 수 있는 일반 계정
Default group to own the driver interface []: dba -> asmlib를 수행할 수 있는 일반 계정의 그룹
Start Oracle ASM library driver on boot (y/n) [n]: y -> 부팅 시 asmlib 데몬실행 여부
Scan for Oracle ASM disks on boot (y/n) [y]: y -> 부팅시 asmlib를 통해 디스크스캔 여부## 오라클 리눅스#1(ol8rac1) 작업 [root@ol8rac1 yum.repos.d]# /usr/sbin/oracleasm init Creating /dev/oracleasm mount point: /dev/oracleasm Loading module "oracleasm": failed Unable to load module "oracleasm" Mounting ASMlib driver filesystem: failed Unable to mount ASMlib driver filesystem ## 오라클 리눅스#2(ol8rac2) 작업 [root@ol8rac2 yum.repos.d]# /usr/sbin/oracleasm init Creating /dev/oracleasm mount point: /dev/oracleasm Loading module "oracleasm": failed Unable to load module "oracleasm" Mounting ASMlib driver filesystem: failed Unable to mount ASMlib driver filesystem▶ol8rac1, ol8rac2 두 노드에서 oracleasm init 실행 시 모듈 활성화에 실패하는 경우 앞선 부팅 커널 이미지와 관련하여 커널 버전이 해당 리눅스 버전과 asmlib로 호환되는지 또는 지원되는지 확인해야 합니다.
※참조: 포스팅 글 DB Oracle ASM 모듈 활성화 실패 해결방법## 오라클 리눅스#1(ol8rac1) 작업 [root@ol8rac1 disks]# pwd /dev/oracleasm/disks [root@ol8rac1 ~]# lsblk NAME MAJ:MIN RM SIZE RO TYPE MOUNTPOINT sda 8:0 0 50G 0 disk ├─sda1 8:1 0 1G 0 part /boot └─sda2 8:2 0 49G 0 part ├─ol-root 253:0 0 44.9G 0 lvm / └─ol-swap 253:1 0 4.1G 0 lvm [SWAP] sdb 8:16 0 25G 0 disk sdc 8:32 0 25G 0 disk sr0 11:0 1 1024M 0 rom [root@ol8rac1 disks]# fdisk -l | grep -i sd Disk /dev/sdb: 25 GiB, 26843545600 bytes, 52428800 sectors Disk /dev/sdc: 25 GiB, 26843545600 bytes, 52428800 sectors Disk /dev/sda: 50 GiB, 53687091200 bytes, 104857600 sectors /dev/sda1 * 2048 2099199 2097152 1G 83 Linux /dev/sda2 2099200 104857599 102758400 49G 8e Linux LVM▶ ol8rac1, ol8rac2 두 노드에서 asmlib 활성화가 정상화 됬다면, 다음으로 추가했던 공유스토리지 디스크를 사용할 수 있도록 등록합니다. 할당된 디스크의 명칭이 /dev/sdb, /deb/sdc 각 25GB가 잘 반영된것을 확인할 수 있습니다.
## 오라클 리눅스#1(ol8rac1) 작업
[root@ol8rac1 disks]# fdisk /dev/sdb

Welcome to fdisk (util-linux 2.32.1).
Changes will remain in memory only, until you decide to write them.
Be careful before using the write command.

Device does not contain a recognized partition table.
Created a new DOS disklabel with disk identifier 0xe9e96be9.

Command (m for help): n
Partition type
   p   primary (0 primary, 0 extended, 4 free)
   e   extended (container for logical partitions)
Select (default p): p
Partition number (1-4, default 1):
First sector (2048-52428799, default 2048):
Last sector, +sectors or +size{K,M,G,T,P} (2048-52428799, default 52428799):

Created a new partition 1 of type 'Linux' and of size 25 GiB.

Command (m for help): p
Disk /dev/sdb: 25 GiB, 26843545600 bytes, 52428800 sectors
Units: sectors of 1 * 512 = 512 bytes
Sector size (logical/physical): 512 bytes / 512 bytes
I/O size (minimum/optimal): 512 bytes / 512 bytes
Disklabel type: dos
Disk identifier: 0xe9e96be9

Device     Boot Start      End  Sectors Size Id Type
/dev/sdb1        2048 52428799 52426752  25G 83 Linux

Command (m for help): w
The partition table has been altered.
Calling ioctl() to re-read partition table.
Syncing disks.
▶ ol8rac1 노드에서 fdisk 명령어를 통해서 할당된 공유스토리지 디스크 DATA 영역 /dev/sdb를 사용할 수 있도록 파티셔닝 해주도록 합니다.
## 오라클 리눅스#1(ol8rac1) 작업
[root@ol8rac1 disks]# fdisk /dev/sdc

Welcome to fdisk (util-linux 2.32.1).
Changes will remain in memory only, until you decide to write them.
Be careful before using the write command.

Device does not contain a recognized partition table.
Created a new DOS disklabel with disk identifier 0x75b89730.

Command (m for help): n
Partition type
   p   primary (0 primary, 0 extended, 4 free)
   e   extended (container for logical partitions)
Select (default p): p
Partition number (1-4, default 1):
First sector (2048-52428799, default 2048):
Last sector, +sectors or +size{K,M,G,T,P} (2048-52428799, default 52428799):

Created a new partition 1 of type 'Linux' and of size 25 GiB.

Command (m for help): p
Disk /dev/sdc: 25 GiB, 26843545600 bytes, 52428800 sectors
Units: sectors of 1 * 512 = 512 bytes
Sector size (logical/physical): 512 bytes / 512 bytes
I/O size (minimum/optimal): 512 bytes / 512 bytes
Disklabel type: dos
Disk identifier: 0x75b89730

Device     Boot Start      End  Sectors Size Id Type
/dev/sdc1        2048 52428799 52426752  25G 83 Linux

Command (m for help): w
The partition table has been altered.
Calling ioctl() to re-read partition table.
Syncing disks.
▶ ol8rac1 노드에서 fdisk 명령어를 통해서 할당된 공유스토리지 디스크 RECO 영역 /dev/sdc를 사용할 수 있도록 파티셔닝 해주도록 합니다.
## 오라클 리눅스#1(ol8rac1) 작업
[root@ol8rac1 disks]# lsblk
NAME        MAJ:MIN RM  SIZE RO TYPE MOUNTPOINT
sda           8:0    0   50G  0 disk
├─sda1        8:1    0    1G  0 part /boot
└─sda2        8:2    0   49G  0 part
  ├─ol-root 253:0    0 44.9G  0 lvm  /
  └─ol-swap 253:1    0  4.1G  0 lvm  [SWAP]
sdb           8:16   0   25G  0 disk
└─sdb1        8:17   0   25G  0 part
sdc           8:32   0   25G  0 disk
└─sdc1        8:33   0   25G  0 part
sr0          11:0    1 1024M  0 rom
▶ ol8rac1 노드에서 lsblk 명령어를 통해서 /dev/sdb, /dev/sdb 디바이스가 논리적으로 파티션되어 사용할 수 있는것을 확인할 수 있습니다.
## 오라클 리눅스#1(ol8rac1) 작업
[root@ol8rac1 disks]# oracleasm createdisk DATA /dev/sdb1
Writing disk header: done
Instantiating disk: done

[root@ol8rac1 disks]# oracleasm createdisk RECO /dev/sdc1
Writing disk header: done
Instantiating disk: done
▶ ol8rac1 노드에서 해당 디스크를 asm disk로 사용하기 위해서 각각의 명칭을 지정하여 디스크를 생성합니다.
## 오라클 리눅스#1(ol8rac1) 작업
[root@ol8rac1 disks]# ls -ltr
total 0
brw-rw----. 1 oracle dba 8, 17 May 21 23:25 DATA
brw-rw----. 1 oracle dba 8, 33 May 21 23:25 RECO

[root@ol8rac1 disks]# oracleasm listdisks
DATA
RECO
▶ ol8rac1 노드에서 해당 디스크를 createdisk 하여 DATA, RECO 디렉토리가 /dev/oracleasm/disks 경로에 생성된것을 확인할 수 있습니다.
## 오라클 리눅스#2(ol8rac2)2작업
[roo2@ol8rac2 disks]# oracleasm listdisks

[root@ol8rac2 disks]# oracleasm scandisks
Reloading disk partitions: done
Cleaning any stale ASM disks...
Scanning system for ASM disks...
Instantiating disk "RECO"
Instantiating disk "DATA"

[root@ol8rac2 disks]# oracleasm listdisks
DATA
RECO
▶ ol8rac1 노드에서 DATA, RECO 디스크 작업을 모두 마치고, ol8rac2 노드에도 공유디스크로 지정했기 때문에 스캔을 통해서 해당 디스크의 DATA, RECO 디렉터리를 동일하게 가져온 것을 확인할 수 있습니다.
2024.06.09 - [Programming and Database/SQL] - DB Oracle ASM + RAC 환경 구축하기(With.H/W 환경 설치) 1편
DB Oracle ASM + RAC 환경 구축하기(With.H/W 환경 설치) 1편
▣ DB Oracle ASM + RAC 환경 구축하기(With.H/W 환경 설치) 1편※ ORACLE ASM + RAC 구성 실습을 위한 사전 준비 사항01. 실습환경 : Oracle VM VirtualBox 7.0 ■ Download URL : https://www.virtualbox.org/02. 테스트용 서버 : Or
pinetreeday.tistory.com
2024.06.09 - [Programming and Database/SQL] - DB Oracle ASM + RAC 환경 구축하기(With.OS 환경 설치) 2편
DB Oracle ASM + RAC 환경 구축하기(With.OS 환경 설치) 2편
▣ DB Oracle ASM + RAC 환경 구축하기(With.OS 환경 설치) 2편※ ORACLE ASM + RAC 구성 실습을 위한 사전 준비 사항01. 실습환경 : Oracle VM VirtualBox 7.0■ Download URL : https://www.virtualbox.org/02. 테스트용 서
pinetreeday.tistory.com
2024.06.09 - [Programming and Database/SQL] - DB Oracle ASM + RAC 환경 구축하기(With.공유스토리지 구성) 3편
DB Oracle ASM + RAC 환경 구축하기(With.공유스토리지 구성) 3편
▣ DB Oracle ASM + RAC 환경 구축하기(With. 공유스토리지 구성) 3편※ ORACLE ASM + RAC 구성 실습을 위한 사전 준비 사항01. 실습환경 : Oracle VM VirtualBox 7.0 ■ Download URL : https://www.virtualbox.org/02. 테스
pinetreeday.tistory.com
2024.06.09 - [Programming and Database/SQL] - DB Oracle ASM init 모듈 활성화 실패 해결 방법
PS. 포스팅의 내용은 제 기준으로 작성한 것이기 때문에 참고해서 보시면 감사하겠습니다.
포스팅 과정의 오류 및 오타 그리고 궁금한 점에 대해서는 댓글 남겨주세요.
해당 포스팅의 경우 유튜브 쌉DBA님의 동영상을 참고하여 작성했습니다.
728x90반응형'Programming and Database > SQL' 카테고리의 다른 글
DB Oracle21 ASM + RAC 환경 구축하기(With.Oracle Grid Infrastructure 설치) 5편 (4) 2024.06.14 DB Oracle21 ASM init 모듈 활성화 실패 해결 방법 (8) 2024.06.13 DB Oracle21 ASM + RAC 환경 구축하기(With.공유스토리지 구성) 3편 (0) 2024.06.11 DB Oracle21 ASM + RAC 환경 구축하기(With.OS 환경 설치) 2편 (4) 2024.06.10 DB Oracle21 ASM + RAC 환경 구축하기(With.H/W 환경 설치) 1편 (0) 2024.06.09